Saturday, March 30, 2013

Easter Blessings


I CASEd this card from a card I saw on Pinterest made by Chiaki Haverstick. I changed the colors and the look a bit.  Once again I used the paper from the Print Poetry Designer Paper Stack. I'll miss that stack once the Spring Catalog is finished. For now I'll just enjoy using it!
Supplies Used
Stamps - Easter Blessings, Papillon Potpourri
Cardstock - Whisper White, Marina Mist, Summer Starfruit
Ink- Marina Mist, Summer Starfruit, Lucky Limeade Stampin' Write Markers, Marina Mist Ink pad
Paper - Print Poetry Designer Series Paper Stack
Accessories - Bitty Butterfly Punch, Vanilla Seam Binding Ribbon

Easter Blessings to You!

Friday, March 29, 2013

A Round Array


Spring is in the air....which means a new 2013-1014 Annual Catalog will soon makes it's debut with lots of new and exciting product! Stampin' Up! is offering a sneak peek of a new stamp set called A Round Array. There are eight stamps in this set and they coordinate with the 7/8" Scallop Punch currently in the Spring Mini Catalog. Click HERE to View the Flyer with Details 

I love when stamp sets coordinate when used together. In this sample I used the Quint-Essential Flower with the You Make Me Smile image from A Round Array. The Quint-Essential Flower is a single stamp. I stamped it twice. Once in Calypso Coral and punched with the 2-3/4" Scallop Circle Punch. I stamped again in Sahara Sand and punched using the 1-3/4" Scallop Circle Punch. The image in the center was stamped with Lucky Limeade and Calypso Coral - punching with the 7/8" Scallop and then fussy cutting the circle and adhering it to the Lucky Limeade scallop. 

Supplies Used
Stamps - Quint-Essential Flower, A Round Array
Cardstock - Sahara Sand, Very Vanilla, Lucky Limeade
Paper - Tea For Two Designer Series Paper, First Edition Specialty
Ink - Calypso Coral, Lucky Limeade, Sahara Sand
Accessories - Natural 7/16" Trim Ribbon, 3/16" Corner Rounder Punch, Dimentionals 

The A Round Array image used in this sample is the small scallop around the bee- a stamp from Collage Curious Set. This is a 4x4 card size, perfect for a small note of thanks! 
There is just enough room on the inside for writing. 

Supplies Used
Stamps - A Round Array, Collage Curious, Petite Pairs
Cardstock - Crumb Cake, Whisper White, So Saffron
Paper - Print Poetry Designer Series Paper Stack
Ink - Raspberry Ripple ink pad, Daffodil Delight and Soft Suede Stampin' Write Markers
Accessories - Linen Thread, 1-1/4" Scallop Circle Punch, Honeycomb Embossing Folder


Thursday, March 28, 2013

Easter Egg

I came across a Styrofoam egg in one of my craft drawers the other day and decided to decorate it. I saw an idea on Pinterest and this is what I came up with.  

 I used the Boho Blossoms Punch and punched just the small flower out of Pink Pirouette cardstock. After attempting to use the Tombo Multipurpose Liquid Glue, I decided it was easiest and less messy to use hot glue to attach the flowers.

I wrapped the egg with a piece of Delicate Details Lace Trim which is self adhesive. Searching through my scrap bin, I found a piece of Twitterpated Designer Series Paper and punched a few butterflies using the Bitty Butterfly Punch and attached those with hot glue as well.

I never know what I'll find in one of my craft drawers. I like how this turned out. What do you think? 

Supplies Used
Boho Blossoms Punch, Pink Pirouette cardstock, Twitterpated designer Series Paper, Bitty Butterfly Punch, Delicate Details Lace Tape, Whisper White Taffeta Ribbon.

Wednesday, March 27, 2013

Dare to Dream


A simple card using mostly scrap cardstock. The front of the card was embossed with the Honeycomb Embossing Folder. I Stamped Dare to Dream on a scrap piece of Whisper white and punched out the butterflies with cardstock  from my scrap bin as well. Oh, I did stamp the large butterfly first before punching it out.  A great way to use those scraps up! To add a bit of depth, I sponged parts of the honeycomb with Certainly Celery Ink - the same color as the cardstock, and sponged the butterflies with So Saffron Ink. This card did not take long at all to make. Love when a card comes together quickly. 

Supplies Used
Stamps - Loving Thoughts, Papillon Potpourri
Cardstock - Certainly Celery, Whisper White, So Saffron
Ink - Basic Gray, So Saffron
Accessories - Basic Pearls, Linen Thread, Glue Dots


Tuesday, March 26, 2013

Posies


Create. Imagine. Inspire. These words were floating around in my head so I decided to put them on a card! I had a lot of the flowers left from the Pop-Up Posies Designer Kit and I thought they would be great for the card that was formulating in my head. I used the Houndstooth Embossing Folder on scrap Basic Gray cardstock and cut them into 1-1/2" squares and placed them on the front of my Basic Gray card base. The flowers were to plain for the card so I ran those through the Houndstooth folder as well. They needed some bling so I added rhinestones and pearls! 

I think they turned out really cute.

Supplies Used
Stamps - Loving Thoughts
Cardstock - Basic Gray, Whisper White
Accessories - flowers from the Pop-Up Posies Kit, Basic Pearls, Basic Rhinestones, Houndstooth Embossing Folder, Dimentionals. 

Monday, March 25, 2013

This and That

Your life is Awesome. Quirky. Perfectly messy. And happening really fast. With the new product line from Stampin' Up! you'll be able to capture it on-the-go. This and That will debut in the 2013-2014 annual catalog but, but you have a chance to get it now!


Click here to order your This and That Bundle now


Item
Description
Price
131268
Epic Day This and That Journal
$10.95
130814
Epic Day This and That Designer Series Paper
$10.95
130133
Remember This and That Rotary Stamp
$5.95
131271
Epic Day This and That Designer Stickers
$4.95
131269
Epic Day This and That Designer Washi Tape
$4.95
133350
Epic Day This and That Bundle
Includes the five This and That products listed above. Only available in a bundle until April 30.
$32.08
15% Off Retail Value!


The Fine Print
  • Stampin' Up! is introducing the line with these five products, but will be adding more This and That stuff as time goes on. 
  • You can purchase each item individually but when you buy the bundle you save money. 
  • Bundle Dates: March 23-April 30 (remember the items that come in the bundle will be available in May and in the new catalog, but they are only offering the discounted bundled until April 30). 


Sunday, March 24, 2013

Thoughts of you

A quick and easy card with very little stamping. I used the Cloudy Day Embossing Folder and sponged the clouds with Bashful Blue ink.
Supplies Used
Stamps - Loving Thoughts
Cardstock - Whisper White
Ink - Bashful Blue
Paper - Tea for Two Designer Series Paper
Accessories - Elegant Butterfly Punch, Bitty Butterfly Punch, Rhinestones, Striped Organdy Ribbon, Cloudy Day Embossing Folder

Saturday, March 23, 2013

Paper Pumpkin

Check out THIS POST to learn about receiving My Paper Pumpkin in the mail each month.


 Look what came in my mailbox the other day...


My Paper Pumpkin Kit!! How exciting! All wrapped up nice and neat with a cute sticker. 

Here is what was wrapped up in that tissue. A pack of four cards and envelopes ready to assemble with polka dotted paper, self adhesive die cuts, buttons, stamps, ink pad and a clear block! The only thing not in the kits is the adhesive. I finally had a chance to play this afternoon and here is what I came up with.

This is the way the sample is pictured on the front of the package so I just copied it! No thinking required with this kit. I could have made all four cards like this, but I decided to get creative! 
I cut a strip from the polka dot piece and made a banner by cutting an angle. The smaller striped piece is one of the self adhesive die cuts which is already cut with an angle. I just peeled it off and stuck it down along with the green scallops and green circle. Once everything was in place, I inked up the stamp and stamped it. I love that the stamp has two different fonts! The button finished it! 
This one is similar only the polka dot strip was cut to the length of the card and the verse I stamped is from the Petite Pairs stamp set. You will notice the green base. I actually cut one of the grey cards at 4x5-1/4 and layered it onto a Lucky Limeade card base. 
Here is the other half of the grey card that I cut. I layered this onto a Daffodil Delight card and used some Daffodil Delight Seam Binding Ribbon. The water marks on the card is the other stamp that comes in the kit. 
I just had to use my Big Shot on one of the cards. The grey base card is embossed with the Perfect Polka Dots Embossing Folder. I used a tag punch after stamping the hey there friend. I stamped the verse again on Whisper White and just cut out the friend to layer here on the tag giving it dimension. I cut what was left of the green scallops and added them to the tag. 

What a fun afternoon I had creating! As I said, with these kits you can copy exactly as it is shown, or be as creative as you want! I can't wait till next month to see what project will come! Be sure to check out THIS POST to learn how you can start receiving a box full of fun each month!

Friday, March 22, 2013

Sale-a-Bration Feeling Sentimental

 I made this card on the first day of Spring! I think I got a little carried away with the flowers, but I do like how it turned out. It's bright and cheery and makes me smile! I think it will put a smile on the face of the person who receives this card as well, don't you?
Supplies Used
Stamps - Feeling Sentimental, Bloomin' Marvelous
Cardstock - Daffodil Delight, Melon Mambo, Pumpkin Pie, Whisper White
Ink - Daffodil Delight, Melon Mambo, Pumpkin Pie, Lucky Limeade
Accessories - Striped Organdy Ribbon - Melon Mambo, Fancy Flower Punch, Dimentionals

Today is the last day of Sale-a-Bration! After today, you will no longer be able to get any of the FREE product that is in the SAB brochure which you can view HERE For every $50 you spend, you get to choose one of the SAB products for FREE. We all like Free! Click below to go to my online store and start your shopping.

Thursday, March 21, 2013

Sale-a-Bration Madison Avenue

 Simple, simple card to make using the Madison Avenue stamp set. I picked a piece of Whisper White cardstock out of my scrap bin and began from there.

The inside needs to be pretty as well! I used a scrap piece of Sycamore Street Designer Series Paper here to bring all the colors from the front to the inside. 
Supplies Used
Stamps - Madison Avenue, Teeny Tiny wishes
Cardstock - Lucky Limeade, Tangerine Tango, Island Indigo, Whisper White
Paper - Sycamore Street Designer Series Paper
Ink - Lucky Limeade, Tangerine Tango, Island Indigo
Accessories - Sycamore Street Ribbon and Button Pack

Only two more days left to take advantage of Sale-a-Bration and FREE product choices! You can see the choices by clicking HERE Sign up to receive my newsletter and learn how you can join my Virtual Party and a chance to earn hostess benefits and three hand stamped cards!

Tuesday, March 19, 2013

Bloomin' Marvelous Easter Card


 Pool Party and Wisteria Wonder are my two favorite color combinations. I started with Pool Party card base. I stamped a slightly smaller piece of Pool Party Core'dinations cardstock and then embossed with the Vine Street Embossing Folder - a FREE Sale-a-Bration choice! I sanded the Coordinations cardstock to give a bit of texture. This cardstock is not died all the way through so when it is sanded, you see a bit of white.

You can see the textures here. The Easter Blessings is a single stamp - it is such a beautiful font! After stamping, I cut it out using one of the Oval Framelits and layered it on top of a slightly bigger oval that was cut with the same Framelit set. I wanted a punch of color so decided to stamp the butterfly in Primrose Petals and punch out with the Bitty Butterfly punch. I added a piece of Wisteria Wonder Ruffled Ribbon for a finishing touch.

Here is the inside. 

Supplies Used
Stamps - Bloomin' Marvelous, Easter Blessings
Cardstock - Pool Party, Wisteria Wonder, Whisper White, Core'dinations Cardstock
Ink - Pool Party, Wisteria Wonder, Lucky Limeade
Accessories - Vine Street Embossing Folder, Wisteria Wonder Ruffled Ribbon, Sanding block, Bitty Butterfly Punch, Glue Dots, Dimentionals


Monday, March 18, 2013

Sale a Bration - Bloomin' Marvelous

 This is a fairly simple card to create. What makes it simple are the coordinating punches used with the stamps. No fussy cutting needed. I used the Whisper White ink pad to stamp a background, added scraps of designer paper and a bow, stamped the butterflies and punched them out with the Bitty Butterfly Punch and adhered with Glue Dots. The verse was punched with the Large Oval and layered onto a punched piece of cardstock with the Scallop Oval.  It only took me a few minutes to put together.


 Supplies Used
Stamps - Bloomin' Marvelous
Cardstock - Crumb Cake, Whisper White, Summer Starfruit
Ink - Midnight Muse, Summer Starfruit, Island Indigo. Whisper White
Accessories - Print Poetry Designer Series Paper Stack, Midnight Muse Satin Ribbon, Large Oval Punch, Scallop Oval Punch, Bitty Butterfly Punch

There is only one week left to take advantage of FREE product! Sale a Bration ends March 22. You can view the flyer by clicking HERE  Sign up to receive my newsletter and a last minute Sale a Bration special I am running!

Sunday, March 17, 2013

Best of 25 Years Blog Tour

Welcome to another Best of Blog Tour. This tour features the stamp set Best of Love. Enjoy my samples!


Happy St. Patrick's Day! My first card features a shamrock made with the heart in the set. I stamped it and then cut it out with one of the heart shapes in the Hearts Framelits set. The stamp is not the same shape as the heart framelit but what I liked was the pattern. I just love bright green and white together.
Supplies Used
Stamps - Best of Love, Secret Garden ( the stem )
Cardstock - Gumball Green, Whisper White
Ink - Gumball Green
Accessories - Gumball Green Satin Ribbon, Hearts Framelits, Vine Street Embossing Folder ( a FREE sale a bration choice, only one week left to get this! )

Love is in the air around our house. My oldest son Adam AND my daughter Rebecca both got engaged in December. Both on the same day! We knew that they both may be getting engaged soon, but on the same day? December 22 was the day, or evening I should say. Rebecca and Marc came for dinner with their announcement first while Adam and Steph were at Longwood Gardens. We had a feeling that Adam was going to propose and sure enough when they came home, Steph flashed us her ring! It was a fun evening with two very happy brides to be! Adam and Steph are getting married in August and their colors are Night of Navy and Daffodil Delight as you see in the sample above. 

  Marc and Rebecca have a date set in March of 2014 and their colors are Eggplant Envy and Lucky Limeade. We are in full wedding mode here. I will be making the invitations for both weddings. Stay tuned. I will be sharing. 
Supplies Used
Stamps - Best of Love
Cardstock - Night of Navy, Daffodil Delight, Eggplant Envy, Lucky Limeade
Ink - Night of Navy, Lucky Limeade
Accessories - Lacy Brocade Embossing Folder, Color Collection designer Series Paper Stacks, Perfect Plum Taffeta Ribbon, Daffodil Delight Seam Binding Ribbon. 

To make the seam binding ribbon scrunchy looking just pull a piece of thread from the end and gather it.
 Be sure to make the inside of your card pretty as well. 

 Supplies Used
Stamps - Best of Love, Madison Avenue ( free sale a bration choice ) 
Cardstock - Crumb Cake, Whisper White
Ink - Crumb Cake, Pool Party, Tangerine Tango
Accessories - Pool Party Seam Binding Ribbon, 1-1/4" Scallop Circle Punch

 This turned out to be a bright and cherry card! I used two free sale a bration products for this sample - Sycamore Street Designer Series Paper and Sycamore Street Ribbon and Button pack. I used the Pool Party Ribbon from that selection. I pulled the color scheme from the designer paper. Makes things easy! I used markers to color in the Read My Lips image so that I could have the lips be a different color.And here is the inside...

Supplies Used
Stamps - Best of Love, Teeny Tiny Wishes, Delightful Dozen
Cardstock - Tangerine Tango, Island Indigo, Whisper White
Ink - Island Indigo, Tangerine Tango and Rich Razzleberry, Tangerine Tango and Island Indigo Stampin' Write Markers
Accessories - Sycamore Street Designer Series Paper, Sycamore Street Ribbon, Bitty Banner Framelits, Apothecary Accents Framelits

 Okay, now work with me here folks on this one. Haha! The pig from Button Buddies came to mind when I was thinking of an image to use for an olive! Come on - you see it don't you?! I love how the card turned out. I showed it to my husband and he thought it was clever. 
Just a little tip. I used Old Olive for my card base and wanted to layer the Olive You image on green as well so I layered it onto a piece of Lucky Limeade cardstock which is just a bit lighter. That way it stands out a little more. Gotta love the button nose. 
And the inside - stamp is from Petite Pairs Set
Supplies Used
Stamps - Best of Love, Petite Pairs, Button Buddies
Cardstock - Old Olive, Lucky Limeade, Riding Hood Red, Whisper White
Ink - Old Olive ink pad and marker, Riding Hood Red ink pad and marker
Accessories - Parker's Patterns Designer Series Paper, Brights Designer Buttons

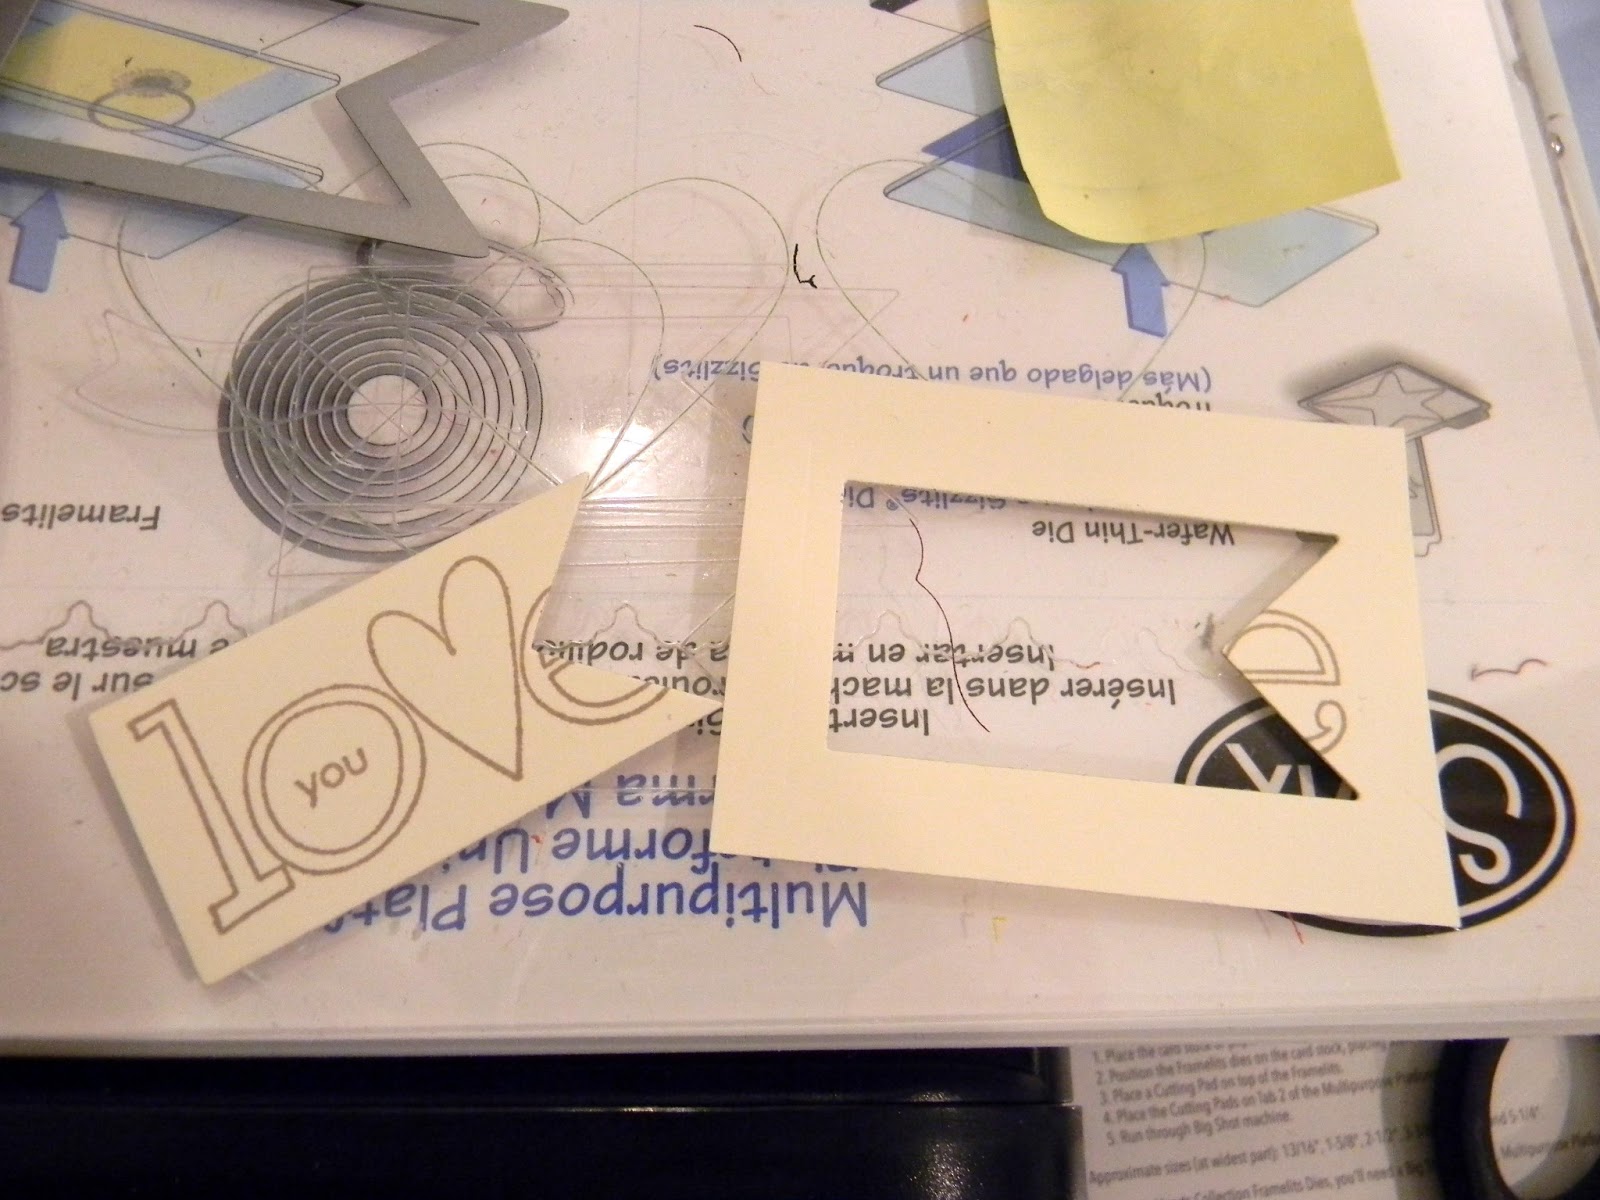
I managed to use all the stamps in the Best of Love set! I struggled a bit with this one but I like how it turned out. The Love did not exactly fit in the Framelit I used to cut it out with. Here is how I did that...
I laid the framelit over the Love image......
Do you know this little trick? Use a post it note to hold the framelit in place so it will not move. I keep post it notes by my Big Shot and use them every time I use framelits. Just lay the cutting plate right on top and send it through the Big Shot.
This is what you are left with. I cut out the rest of the letter e
Then I did my best to use dimentionls and put it into place so that the word is complete. Pretty neat! It's the little things that make me happy : )  As you see in the stamped Love image above, there is a You in the center of the O. I covered that with one of the Vanilla Flowers that I colored with a sponge and ink. I used a Crumb Cake marker and colored the You image, stamped onto Pretty in Pink cardstock and punched with the Small Heart Punch.
Supplies Used
Stamps - Best of Love
Cardstock - Crumb Cake, Pink Pirouette, Pretty in Pink, Very Vanilla
Ink - Crumb Cake, Pretty in Pink
Accessories - Tea For Two Designer Series Paper, Crumb Cake Seam Binding Ribbon, Vanilla Flower Trim, Small Heart Punch, Hearts a Flutter Framelits, Square Lattice Embossing Folder

This was fun! I hope you enjoyed my samples. You are now headed to Anne Mataci blog.